http://www.youtube.com/watch?feature=player_detailpage&v=0JwPyXu0HpA
Friday, May 31, 2013
Friday, May 3, 2013
Dining room Buffet Table
Buffet Table
My final piece for the dining room was a buffet table. I wanted something simple made from real wood that I could redo
myself…and with a low price tag. Something like this but with more open storage
instead of so many drawers.
"My Inspiration"

So I began my search on craigslist. It took about a week
to find the one that was just right. I found it just 15 minutes away from a
very nice man moving to Michigan…who was selling it for $25. It did have all 3
drawers when we bought it, two of them became firewood for my husband later
that week.

before
We got it home and gave it a good cleaning and sanding.
We had to replace the bottom board with plywood for to create a bottom shelf.
Then I painted the entire thing black to match our fireplace and new
chandelier. Add a few coats of polyurethane to protect it from my children…and
finished!


We already had the sanding, painting supplies. So the
only new costs were for the dresser, the plywood, and new knobs…Total cost $30.
Monday, April 15, 2013
Dining Room Light Fixture
Our Dining room was finally starting to come together. We
had our fabulous Table, our already existing fireplace, and a new 8x10 rug that
I got on clearance for only $39 at Home Depot (because our 5x8 wasn't going to work with our new 8ft table!). Now
we needed some sort of fixture over the table, a buffet for my “Nice
dishes” and some sort of "art" to fill in the huge blank wall at the end of our table. Challenge accepted!
I took the old brass chandelier that came with the house
and spray painted it, then removed the glass and added some chandelier lamp
shades that I found for $2 each, which by the way was very exciting! Online they
were asking for $10 each shade…times 5 shades…are you kidding me! Guardian Angel
Thrift store saved the day again.

Old

New
And Finally the finished product! More info on those fabulous pictures of the kids on my wall...later :)

Monday, March 25, 2013
DIY Dry Erase Calendar
This is pretty straight forward. I saw the picture, I
liked the idea, I made it!
The Idea...

I used an old oak frame I bought at the thrift store
for $1 (painted it white to match my “soon to be Kitchen theme”. Then we went “shopping” at Lowes. I really did
need paint for the kitchen walls, but my secondary goal was to score a bunch of
free color samples for the Calendar. My kids are great at leaving the store
with a million of these in hand! I made sure to get the ones that already had a
small square cut out of them so I wouldn’t have to do it myself.
I put my son to work deciding what order the different shades
of blue should go in. When he was done we taped them down to the paper in the
frame, we went with a white background but any color paper or cloth can be used
to match your décor. I wrote the days of the week and taped them down also but
left the month and number spots blank to fill in with the dry erase marker. Then
we put the back on, hung it up and got to writing.

...Our finished Dry Erase Calendar.
I already had the white paint and white paper, plus the
dry erase markers at home. The paint color samples were free. So the only thing
I actually bought for this was the frame. Total cost: $1
DIY Farmhouse Table...$130 total!
So I decided that at 30 years old, having 3 children now and buying our first home, that it was time for us to own a “grown up” table. Something that wasn't put together with a tool that is included in the box! I
wanted a place that all of us could sit for meals and maybe even some extra room
for guests when they visit. While I wasn't extremely picky about the look of
the table (although my husband would probably disagree with that statement), I
was very picky about how much I wanted to spend. I mean come on…why can’t I
have a farmhouse style table that sits 8-10 people for under $300. Is that
really asking too much? Apparently it was…so I had to either change my plans or
change my budget.
Those who know me, know that I’m not great at compromising when I have a plan set in my mind.
So I decided my very talented and handy husband could certainly find a way to
get me that beautiful table and save us money. Boy was I right! I showed him
the picture of what I wanted.

I found it on Pinterest (where else!). He found
the plans online at this wonderful website http://ana-white.com/2009/12/plans-farmhouse-table-knock-off-of.html,
went off to Lowes to buy the wood, came home and made me a table right in our
dining room in just 4 hrs!

After a good sanding I stained it with a color called gun stock added polyurethane for protection, and viola…a masterpiece! I now
have a beautiful 8 ft long farmhouse table that can fit our whole family plus
guests. Our only change from the actual plans were to omit the stretcher (long
piece of wood that runs under the table) because I could just picture my
children hanging all over it!

Its huge! I'm in love

Bad lighting...sorry
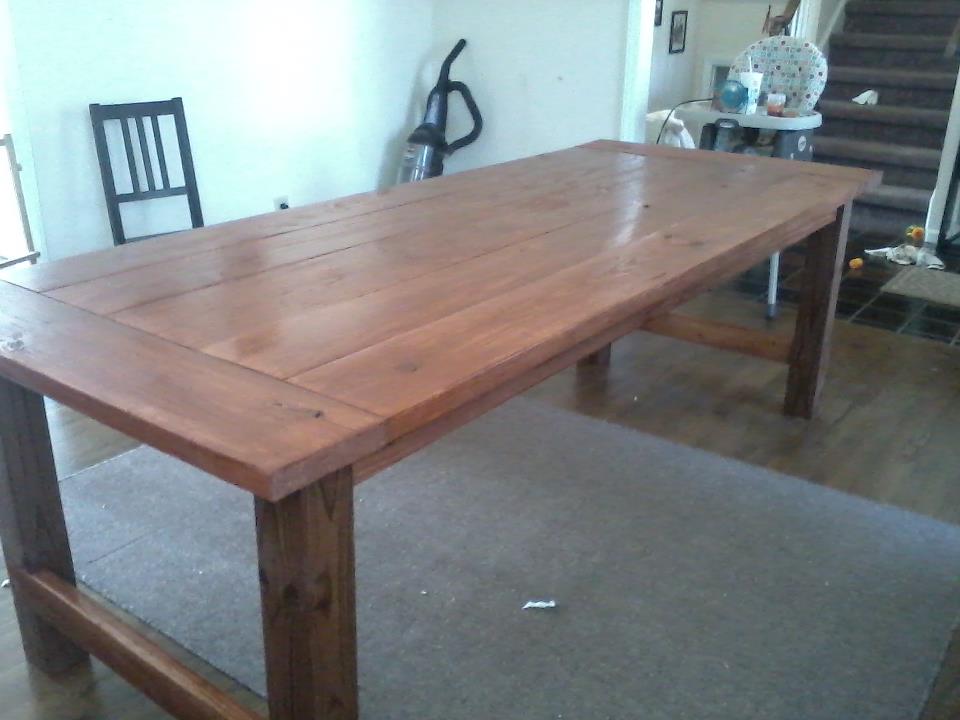
Don't mind the mess
Total cost for the wood, a new toy (Kreg jig) my husband
needed…oops I meant tool ;) the sanding materials and the stain/polyurethane
I picked out came to…$130. I can’t even describe how many times I passed by the
dining room just to look at it!
Saturday, March 23, 2013
Black & Blue End Table ~ $11.50
Room, room and more room! I’m not complaining…but when
you go from an 1200sqft apartment to a 2200sqft home…you seem to have a lot less
furniture. I've never had a living room and separate family room before, so we
are lacking in furniture. Our living room consisted only of a couch (my husband
got a almost new black leather Lay z boy couch from a client for free) and an
area rug that we moved from our dining room when we got our “grown up table”
(that post will be coming soon…and it is Amazing!) Needless to say…it was
lacking not just in furniture, but in character also. I knew I wanted to get an
end table that I could “fix up”. Below is a picture of my "inspiration" from Pinterest. Its completely not the color or design I wanted but I loved that they added their own creativity to it.

So I went to a few different thrift stores over the next week and finally found my diamond in the ruff. It was an old brown end table that had a faint smell of
cigarettes…ugh. After some much needed cleaning and sanding, and airing out, it
was ready to paint. I went with black (a reoccurring theme you will see throughout
my home) and used some of the leftover paint from our bathroom redo to give it
some character. Here is a picture of the wood before we started.

And here is the after shot. I love how it turned out, and in total it only cost me $10 for
the table and $1.50 for new knobs…can’t beat $11.50.

Out with the old...in with the Bathroom redo...$100
Well more than just my blog name has changed in the past 1
& ½ years! I’m now a Stay at home mother of three children…Baby William was
born in July of 1012. Then a month later in August we bought our first home.
Very exciting times but stressful and chaotic too!
One of the beautiful joys of home ownership and raising three
children is no longer having money. Okay maybe I’m exaggerating but I definitely
don’t enough money to decorate my home with the pottery barn and Pier one magazines
that I’d like to. So that’s where Pinterest comes into play. Thousands of pins
filled with inspiration just waiting for me to try!
One of our first big projects was the guest bathroom. Its
kind of small and it was overpowered by dark wood, yellow tile, and a red laminate
counter top…all original to the house! I loved the look of this bathroom (picture below) I found while on Pinterest: http://pinterest.com/pin/179018153910148751/

I loved how the white stood out and looked so clean next
to the cool blue. So we painted the walls with a beautiful blue, put in a
smaller white vanity (on sale for $69 at Lowes), and put down laminate peel
& stick tiles. In total we spent about $100…and it looks like a whole new
space.

Old Bathroom (the red counter peeking out in the corner)

Fresh and clean!

I Love It! And for just $100...it makes me love it even more.
Wednesday, October 19, 2011
$4 Homemade Wall Art

So when you first walk into my house there is a wall straight ahead that has an electrical panel on it. Why they couldn't move it a few feet into the closet...I will never understand. Anyway, I wanted some kind of art to hang there to cover it...without spending a lot of money. The problem was that in order to cover the panel and have the art centered on the space, it would need to be at least 24x36 and fit into our style and color theme!
I saw a really cute Holiday idea for a mantle that used wooden blocks and thought it would be great if I could alter the idea to make wall art instead of tabletop decor. So I went to the dollar store for inspiration and thats when I found everything I needed.
Paper plates (I used black square plates) - $1
Red decorative filling - $1
Ribbon - $1
Bows (they were actually christmas ornaments) - $1
Total cost = $4

It turned out really cute and fits the space and our decor perfectly. The best part was the overall price of only $4 and how easy it was to make. The kids loved watching me make it that they wanted to make one of their own. So I went today to pick up different colored plates plates, colored beads and different colored ribbon ofr my daughter and son to make one of their own for each of their bedrooms. I'll update later to let you know how that goes!

Tuesday, October 18, 2011
Stop and Smell the Roses
Everyday on our walks we pass this same spot...Anjali always has to stop to pick a flower...this was the first day I stopped and realized that the leaves look like hearts...I think it was Gods way of telling me to slow down and enjoy ♥


Thursday, October 13, 2011
Apple picking
As I’ve said many times before fall is my favorite time of year. This is our first fall in North Carolina, and boy are things different down here! First of all the weather is nothing like NJ fall weather. Its been upper 70’s without fail everyday. They have many different pumpkin places and farms with fun family activities but one major thing is missing…Apple picking. I searches all over and found 1 orchard for self picking apples off the tree…it was an hour drive but worth it.


We drove to Millstone Creek Orchard in Ramseur, NC. Of course we got a late start into the season so many of the trees no longer had apples on them but they had a few left for us to pick…and many that had fallen off the tree but were in perfect condition. The kids had fun finding apples and playing on the farm. They had great tire swings set up and sand boxes made out of tractor wheels. My favorite part was the apple cider slushies, and they had great wine cake also. Overall we had a good time and came home with 6lbs of apples.


Then we had to decide what to do with all of those apples! So I created mini apple pies…kind of like the ones at McDonalds…maybe not as pretty…but good!
We drove to Millstone Creek Orchard in Ramseur, NC. Of course we got a late start into the season so many of the trees no longer had apples on them but they had a few left for us to pick…and many that had fallen off the tree but were in perfect condition. The kids had fun finding apples and playing on the farm. They had great tire swings set up and sand boxes made out of tractor wheels. My favorite part was the apple cider slushies, and they had great wine cake also. Overall we had a good time and came home with 6lbs of apples.
Then we had to decide what to do with all of those apples! So I created mini apple pies…kind of like the ones at McDonalds…maybe not as pretty…but good!
Subscribe to:
Posts (Atom)